Lottie Framework Guide: 5 Steps to Create Animation | Django Stars

Meet Lottie Framework
Imagine it’s Monday morning. You wake up and grab your phone to check your Twitter feed. You scroll and scroll – what’s that? Oh, news from NASA. “Like!” And then you suddenly see that the heart-icon has not only changed, but did so gorgeously.

At first, it may seem like nothing. But the truth is, small animations in the interface can make a big difference. When you use a certain app and you know for sure it has reacted to your tap, it means the design was well thought through. The app creators not only made it practical, but also attractive and pleasant to use. And it’s true –animations add uniqueness and mood to an application. Those of you who’ve ever tapped “Heart” on Twitter know this feeling – you simply go “Aaawww!”. Such a reaction proves how important animations can be in an interface. With tiny animations like this, users can’t help but like your product. On top of that, they’ll better understand what’s going on inside the app and how to interact with its interface.
Now imagine you’re a designer who wants to use animation in an app. You must be thinking, “God, this looks so complicated, it’ll take me ages to learn all the tools and understand all the nuances…”. In my experience, these are the questions most newbies ask:
- Where do I start?
- Where do I get drawings I can use?
- I’m not a programmer! Do I have to learn coding?
- How do I optimize the animation so it works smoothly?
- Can I test the animation on a real gadget?
- What do I have to tell the developer so my animation will look the same as the design?
- I always wanted to make an animation! Will I be able to do it?!
If you answered “Yes” to at least a couple of these questions, then you definitely have to try Lottie, a library developed by the design department of AIRBNB, that parses animations from Adobe After Effects using Bodymovin and renders native animation for mobile phones and web device.
Let’s take a look at how to make an animation using Lottie framework. We’ll go through all steps of the creation process so you can better understand what to do, and when.
With 13+ years of experience developing software projects (like the ones you can read about in our Case Studies), the Django Stars team can confirm that the visual appeal of a product increases its chances of winning the heart of demanding modern users. And this can be achieved, among other things, by adding smooth and responsive animation where appropriate.
Creating an Animation: The Process
Before you can enjoy all of Lottie’s features, you have to prepare resources and create a Lottie animation in After Effects. And because these are the most time-consuming and laborious parts of the process, let’s take a close look at what’s waiting for you and what difficulties you may encounter. Custom Lottie animation development consists of these steps:
- Preparing resources to import into After Effects
- Creating animation in After Effects
- Exporting the JSON file with the help of the Bodymovin plugin
- Creating a project in xcode and connecting it to the Lottie framework
- Viewing and testing the animation on a device
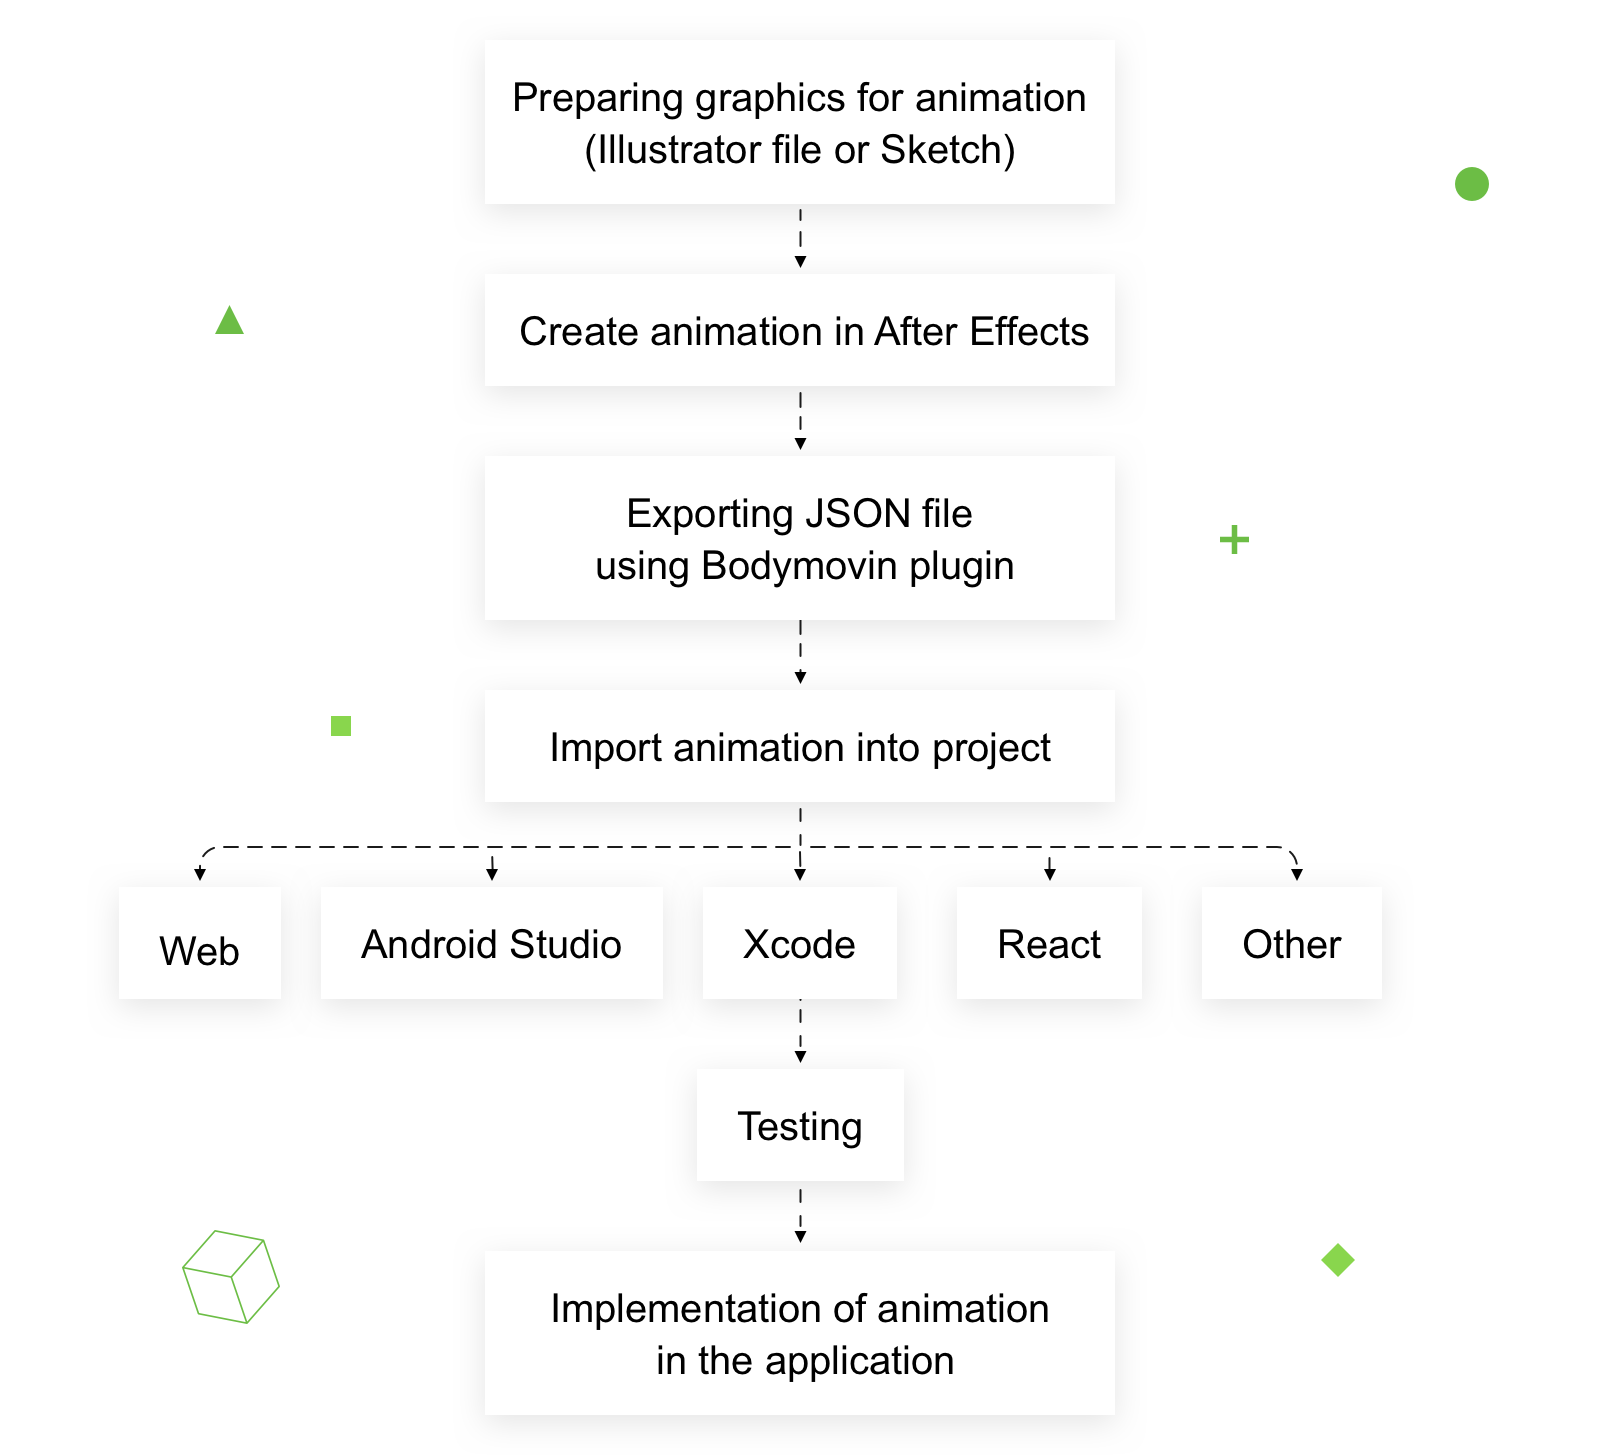
Next, we’ll take a closer look at each of these steps to make a Lottie animation.
1. Prepare Resources to Import Into After Effects
To create the animation, we’ll use the original logo file, prepared using Adobe Illustrator. When we save it correctly, we’ll have access to additional animation options, and we’ll be able to fully control export options. We’ll also place the objects in After Effects the same as we do in Illustrator, and save the structure and the layer titles.
Note: be diligent and orderly with the layers before saving. A well-prepared original of the design, with the right naming and layer order, will save you a lot of time at the next stage – creating an animation with After Effects.
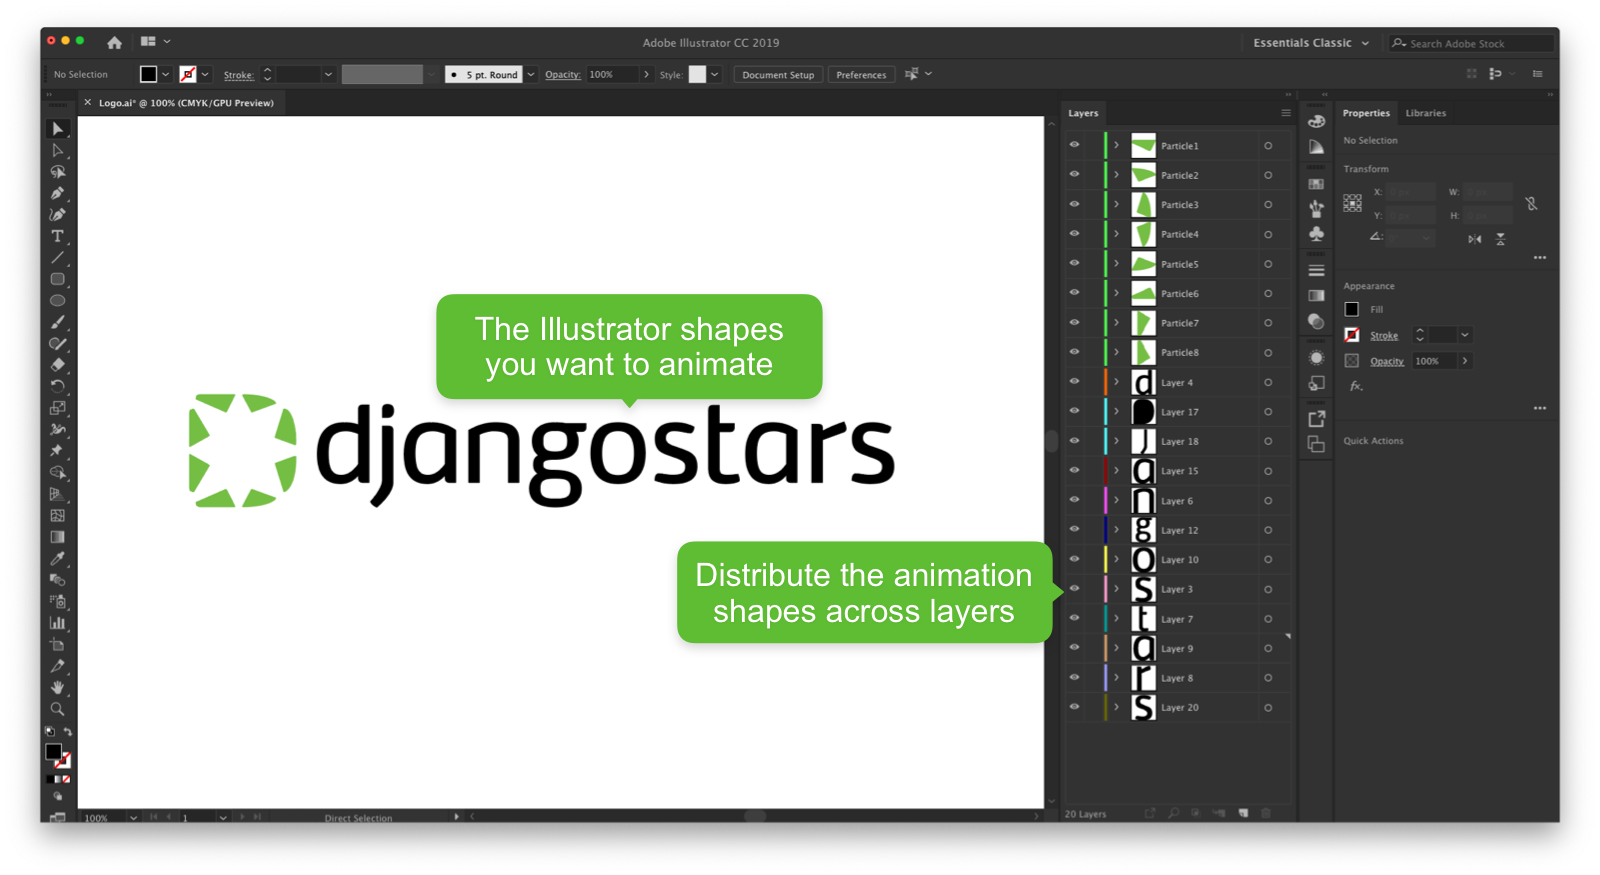
Another important feature: you’ll have access to the Trim Path feature in After Effects to animate image contours (this feature is especially useful when you animate linear icons). When saving the Illustrator file, pick the AI-format.
When importing the file into After Effects, be sure to choose Retain Layer so that layers won’t interlace during the import. Then you’ll be able to animate them one by one.
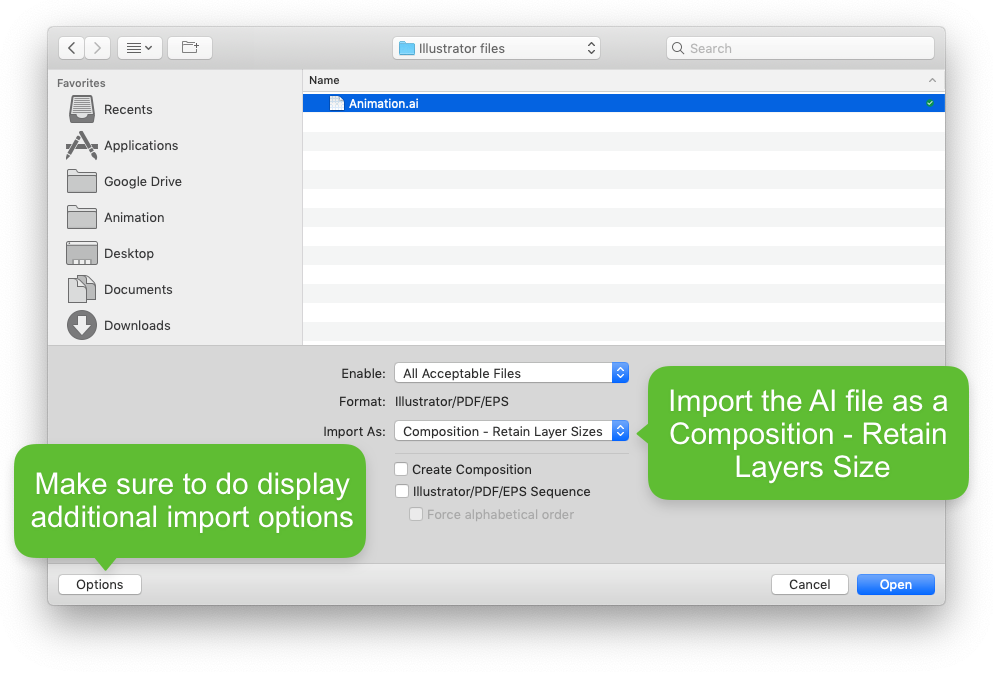
After importing your graphics into After Effects, you should be looking at something like this:
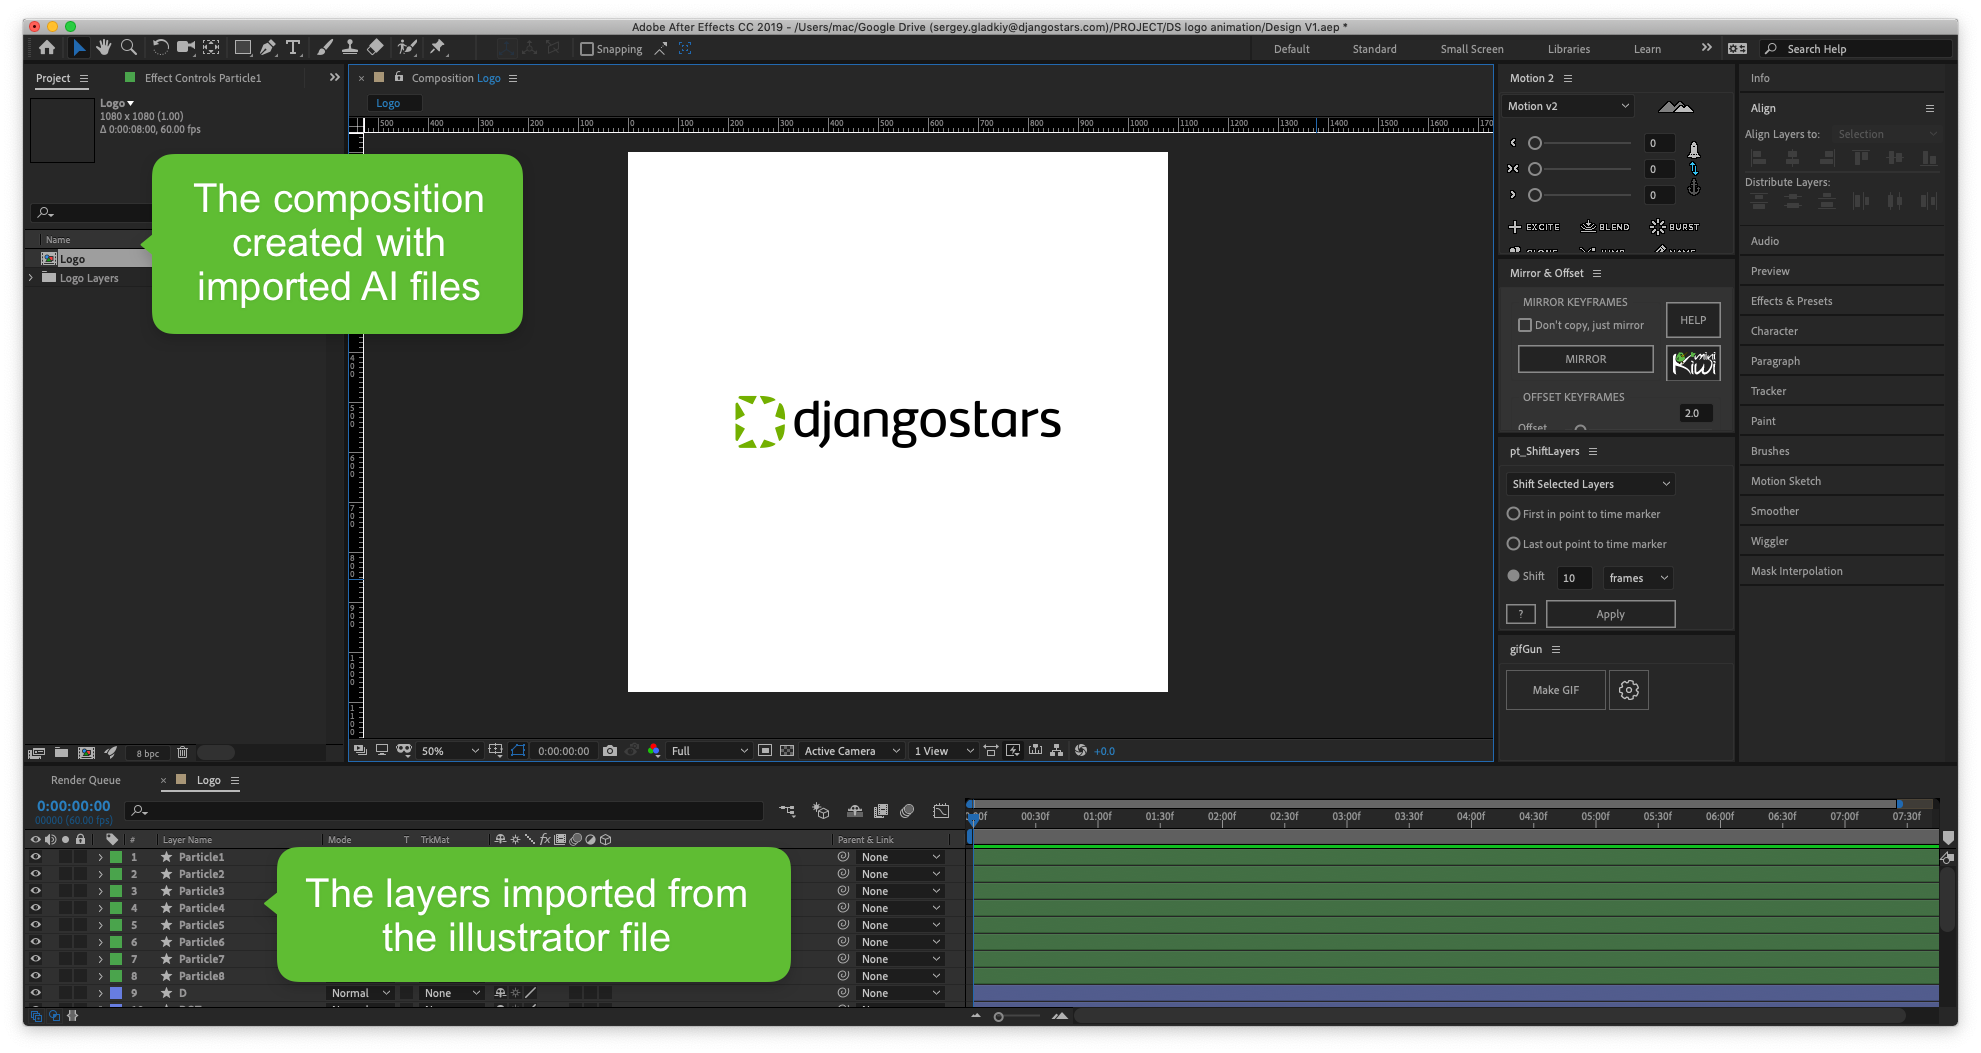
As you see, the original shapes lack sharpness around the edges. But after you import vector images into After Effects, the edges will be smooth, without the extra pixels that make the image look blurry. To get vector images you can edit directly in After Effects, select all the Illustrator layers, right-click them twice and choose “Create Shapes from Vector Layer” in the menu, as shown below:

From now on, After Effects will create shapes and hide Illustrator layers. When creating shapes out of imported graphics, you can use the Expload Shape Layers plugin, which allows you to significantly speed up the process. This way, you’ll see improved sharpness in your animation elements right away.
If you need to export an original from Sketch, use the Sketch2AE plugin. Сompared to Illustrator, Sketch is faster when it comes to preparing materials. Personally, I prefer Illustrator, as it transfers parameters of vector shapes more precisely. Its settings are also more flexible. However, you can work on your graphics in Sketch. As soon as you’re happy with the final version, transfer it into Illustrator.
2. Creating Animation in After Effects
Now that you have imported your originals into an After Effects project and are ready to go, you must be eager to know when you can start working with Lottie. But before you get your hands on your animation, it’s important to remember that:
- Before starting a project, always download the latest version of Bodymovin and check GitHub to see what features aren’t currently supported.
- Lottie restrictions are described at Supported Features.
- Composition support in Lottie is very poorly realized, so try not to use it at all. Alternatively, you can merge all the layers into one composition at the final stage of animation development.
- Don’t use expressions while developing an animation. Calculating expressions in each frame in a browser is a resource-intensive process. On a mobile device, where frame rate is over 60 fps, it’s especially difficult to calculate.
- Use as few dots per inch as possible in masks and key frames in those masks. They increase the file size substantially.
- Plan your animation at the start and use simple effects such as position, scale, opacity, rotate, etc.
- When creating an animation, set the frame rate that’s best for you. It doesn’t necessarily depend on your personal preferences – I use 60 fps, so that the animation will run more smoothly on mobile devices.
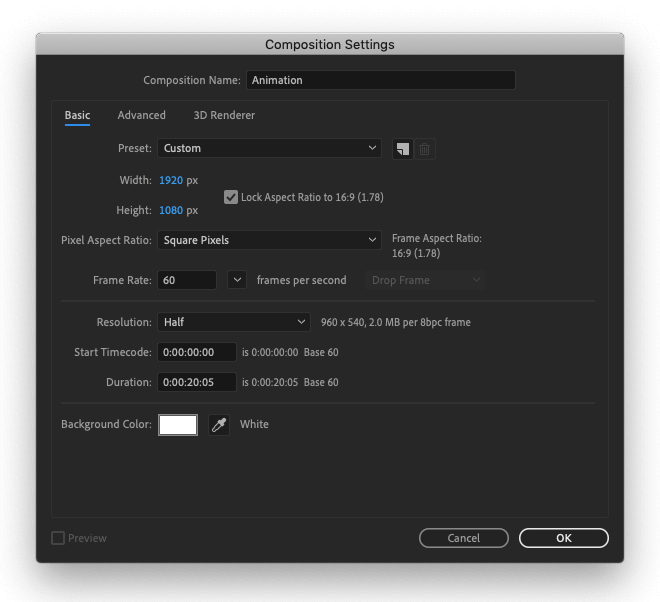
In the Project tab on the left, you’ll see a composition with the same name as your Illustrator file. Double-click the composition to open layers in a tab with the composition name and time scale.
When creating your animation in After Effects, keep in mind where it’s going to be used and how it’s going to look among other animations used in the interface. Animation is not only functional; it also creates a certain mood within an app or website. Which means you have to think about the big picture beforehand. Creating a storyboard with the animation’s key frames is a great way to plan the final result, avoid inconsistencies, and divide complicated animations into simple components.
3. Exporting JSON Files Using the Bodymovin plugin
After finishing the animation, use the ZXP Installer to install the Bodymovin plugin and save your animation as a JSON file. After installing it, go to Window > Extensions > Bodymovin. In an open window, choose a composition to render, the file path, and saving options in Settings. Before you click Save, make sure that Allow Scripts to Write Files and Access Network is ticked in the After Effects settings.
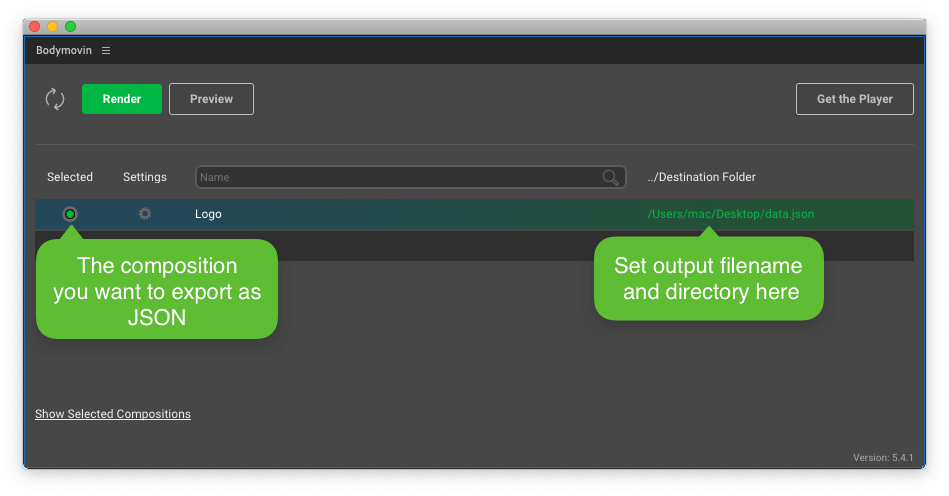
Depending on the results you’re trying to achieve, you can choose different saving options, which are described in detail here.
Done! Now, you can use the JSON file of your animation. Let’s see how it’s going to look on a real device or emulator. To do so, we’ll create a project in xcode and connect the Lottie animation framework.
4. Creating a Project in Xcode and Connecting Lottie
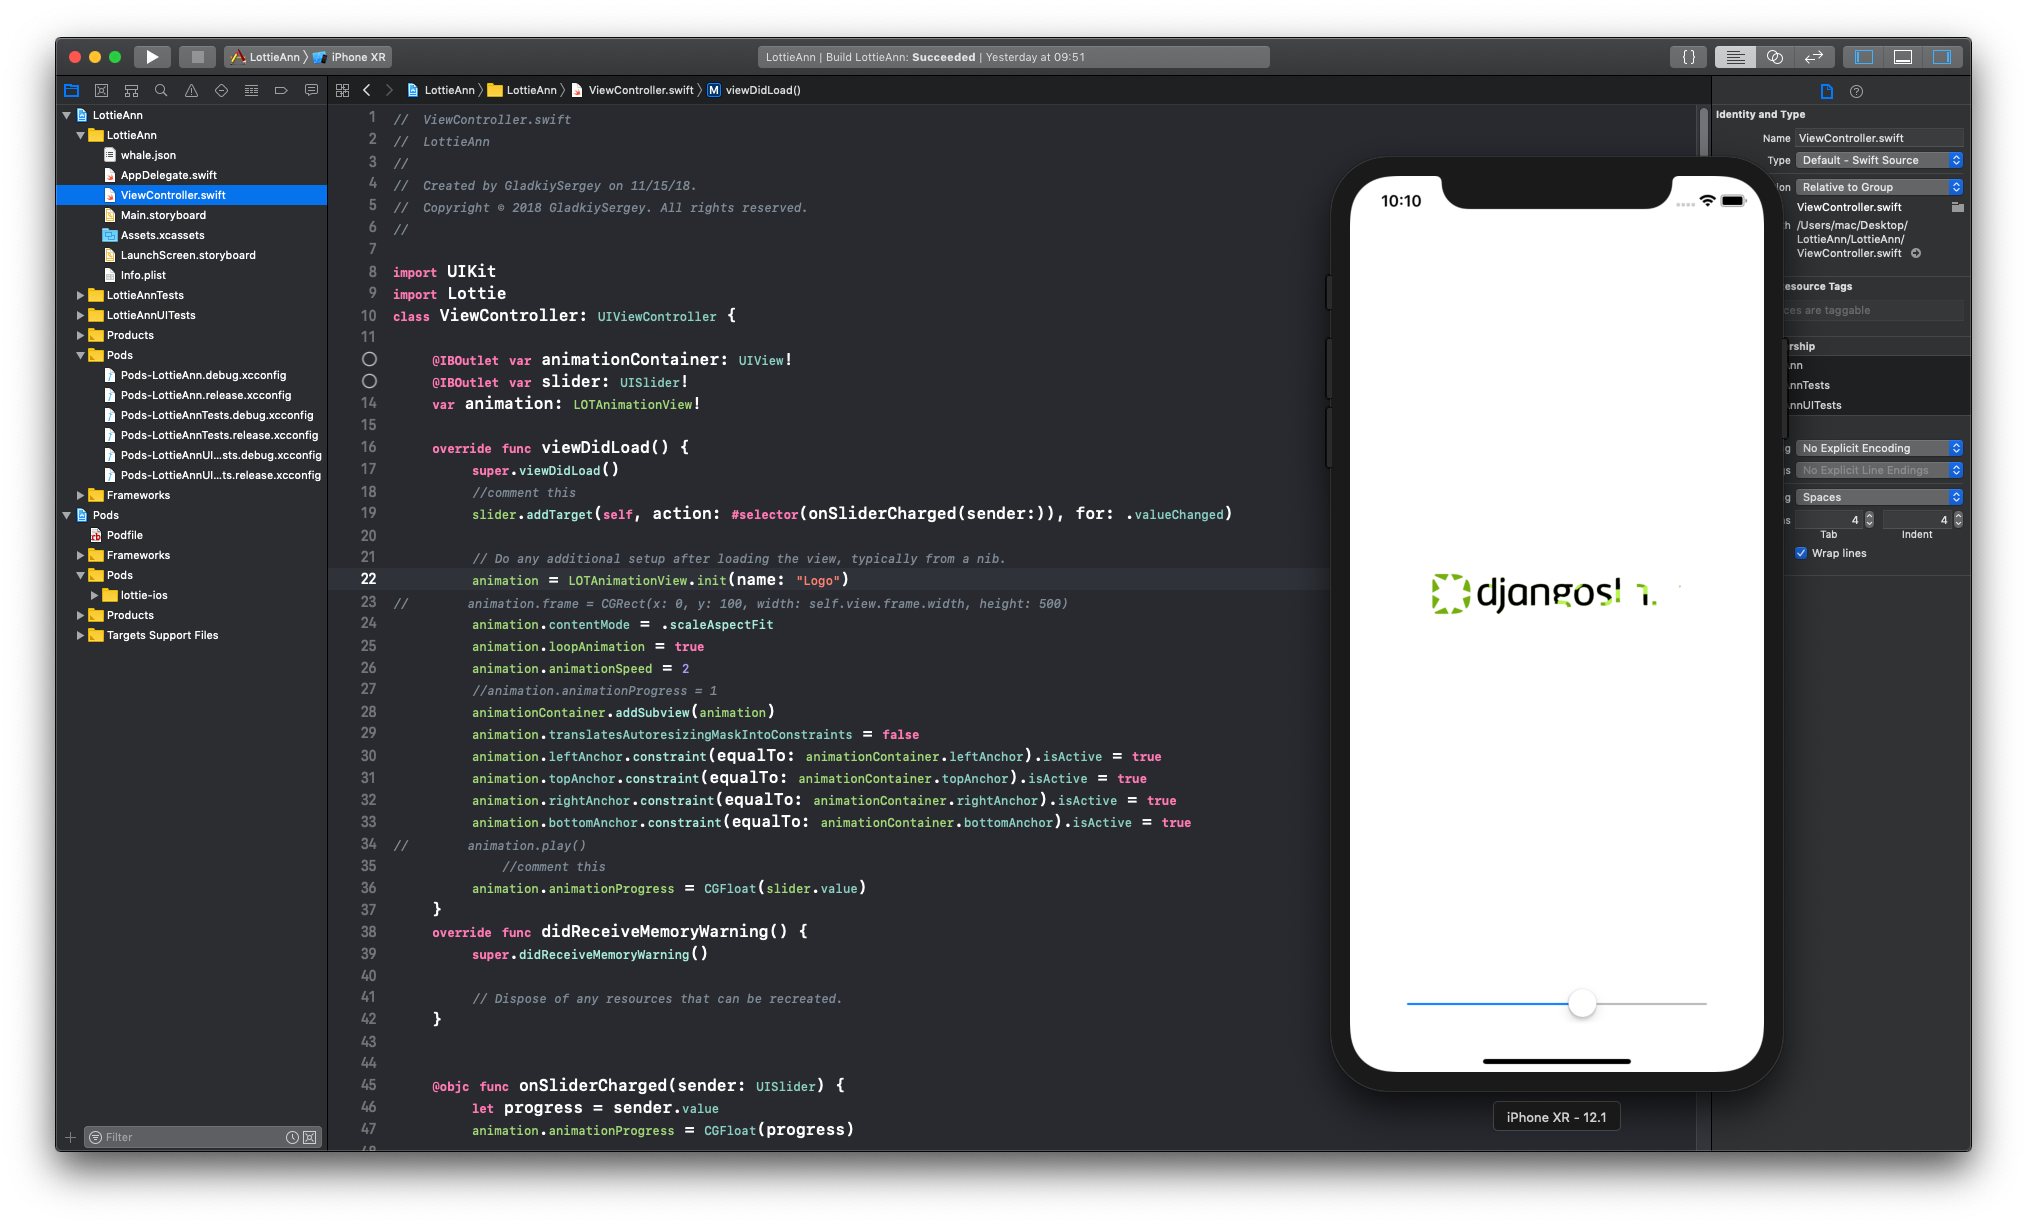
Let’s create an iOS project that will allow us to check the animation in the emulator or on a connected iPhone. There’s a detailed Lottie animation tutorial on how to add the framework and the JSON animation file on the official Lottie website and on YouTube ?. As per the instructions, we will create a project in xcode, and to test the Lottie animation we’ll add a slider that controls the playback progress.
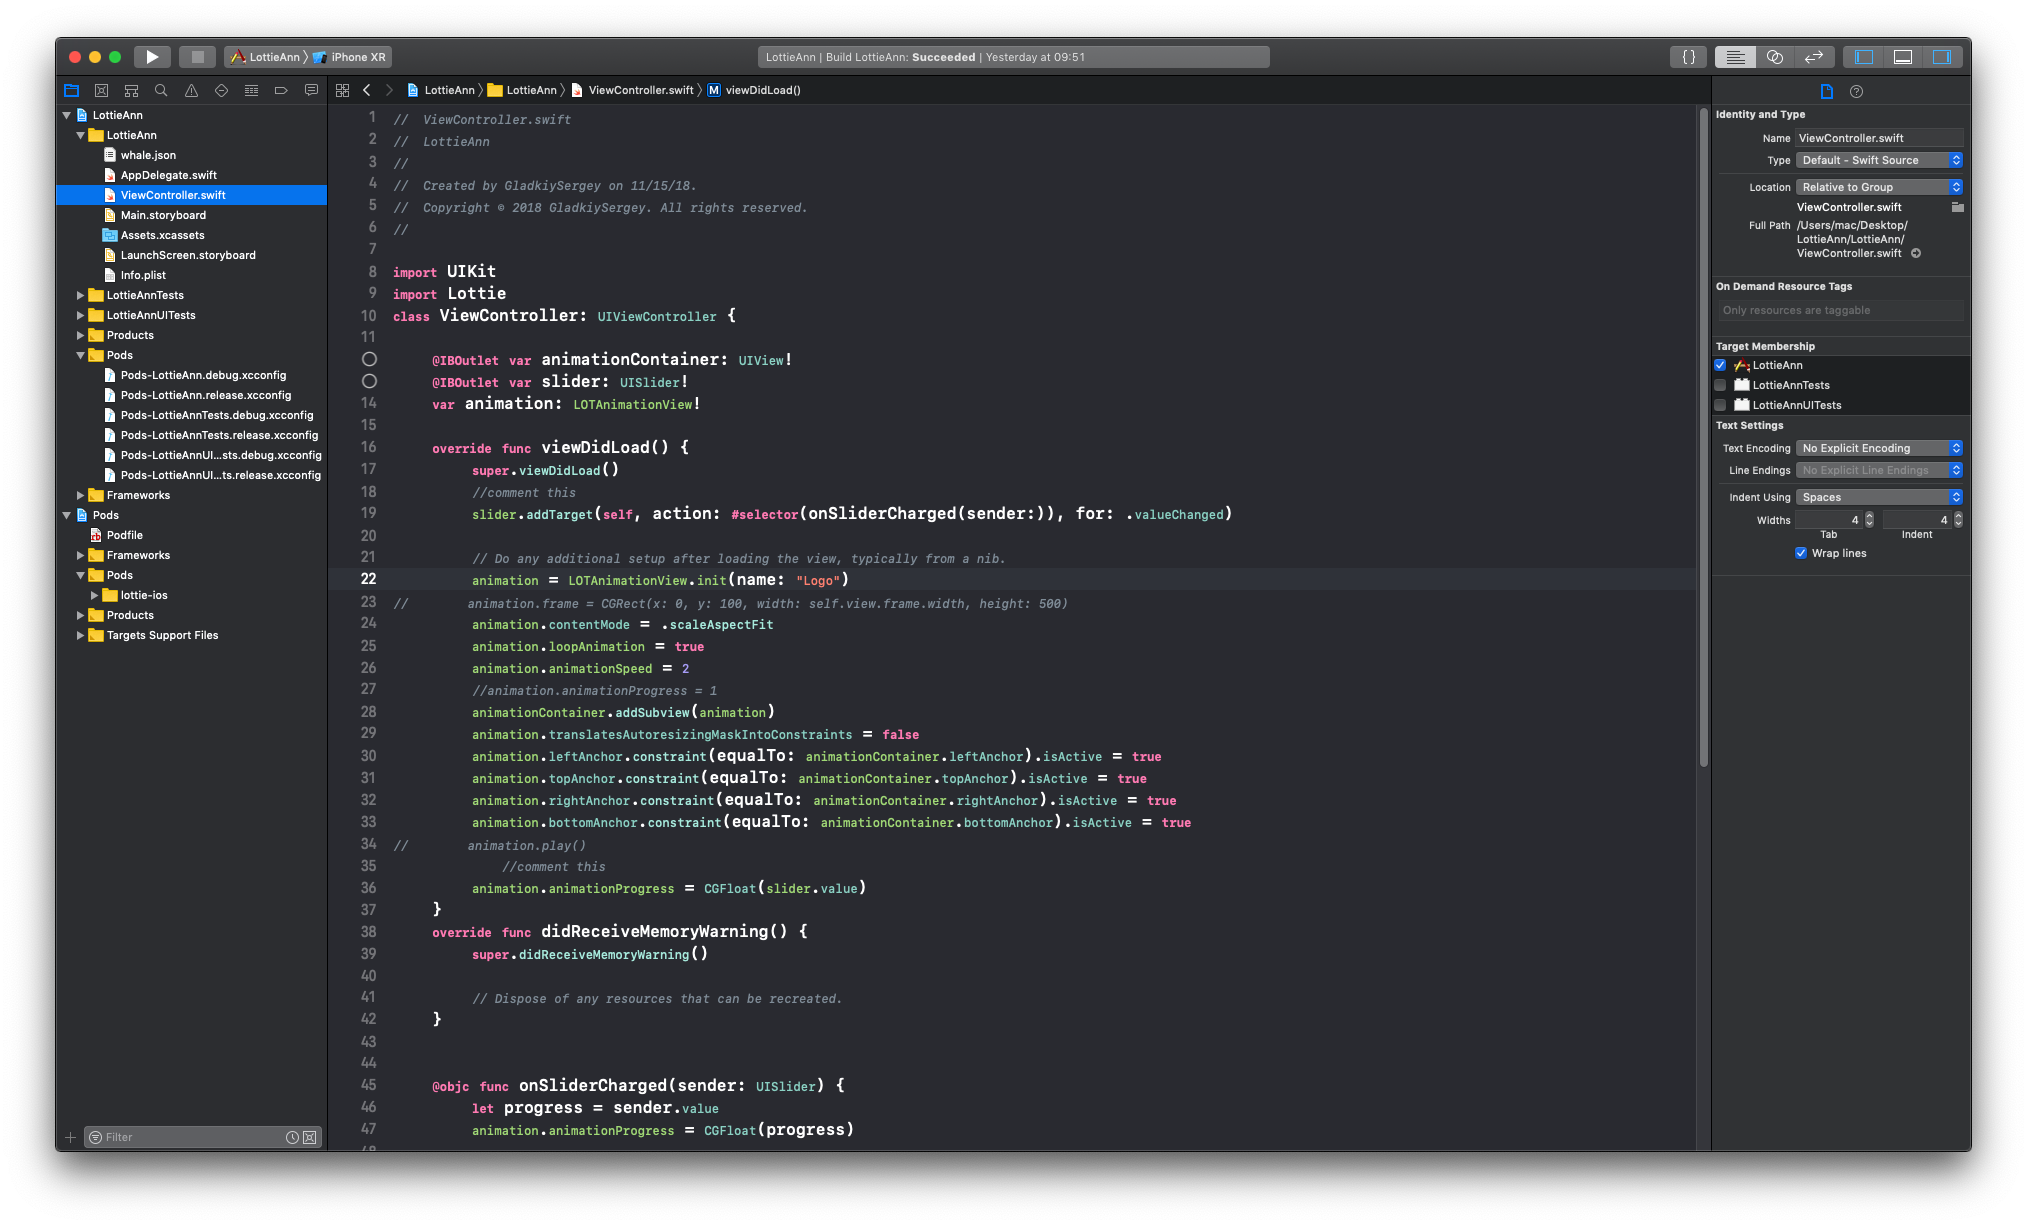
Now you can smoothly change the animation, frame by frame, and thoroughly check the result. To separate the animation testing and playback of the final version, you can comment on two lines:
slider.addTarget(self, action: #selector(onSliderCharged(sender:)), for: .valueChanged)and
animation.animationProgress = CGFloat(slider.value)…and uncomment
animation.play()
At this point, you can watch the animation on a Lottie animation viewer at normal speed (1x) and on repeat – just as it will look in the finished app.

You can download the project file from GitHub and take a closer look at the code, as well as leave comments about how to improve the test project.
Depending on the kind of animation you want in your interface, you can add reactions and animation controls using button, gestures, or something else. You can manipulate the animation’s playback and triggers, speed and other features. There are countless ways to trigger and control animation; it all depends on how much time you have to make sense of xcode. ?
5. Viewing and Testing Your Lottie Animation on a Device
Congrats! Now, you can view your animation on a device or emulator. You have several options:
- Download the Lottie Preview mobile app and use the QR code.
- Drag & drop your JSON-file into LottieFiles.com and scan the QR code on the screen.
The file you drag & drop will be available only to you. You can enable access to it for trusted users. - Connect the xcode file to the project.
- Use another option described here.
Now you can see what your animation will look like when it’s integrated into an app, see how it runs, and get the results you want after a couple of iterations. If you want to change something, you can…
- change the animation in After Effects;
- save the JSON file with Bodymovin; or
- refresh the JSON file in the xcode project.
If your result of testing a Lottie animation doesn’t match your design in After Effects, you may have used a parameter that doesn’t support Lottie. To quickly identify what causes this, test parts of the animation one by one.
As soon as you’ve finished testing the animation on a device and setting the playback settings, you can give the JSON file (and the xcode project file, if necessary) to the developer. Also, you can provide them with the animation video.
To test the animation on the Web, you can use built-in browser tools that show you how fast the animation loads and what the playback parameters are. For mobile, you can use xcode’s built-in debugger and test the animation on real devices, or on an emulator where you can choose the required iOS and device.
What Makes Lottie Great?
First and foremost, using Lottie for animation will not just help you make your product unique, but also give your users an improved UX. Developing it in After Effects will allow you to create your animation exactly the way you imagined it and test it before embedding it into the code. Lottie is an open-source library, developed by the Lottie community.
On top of all this, you can modify the animation and test the viewing experience across different devices during the development process, independently from the mobile developers.
Besides, the library is very lightweight, which is why it quickly loads to apps and websites. It’s universal and can play animations on various operating systems with limited resources, which is why it can be played even on slow-performing devices.
During the development process, you will notice how easy it is to generate a new version of an animation and add it to the project. Consequently, you can focus on animation design, and not on the tool it’s being done with.
After just a couple of iterations, you’ll have set it up exactly the way you wanted it from day one. And when it’s done, all you have to do is pass playback parameters to the developers.
The Lottie library is super adaptive, and you can change many parameters of animation elements. It supports the Alpha channel; in my opinion it’s better to use transparency with SVG elements than MP4 video or GIF because the SVG smoothing quality is much better. Besides, if you realize your animation as a GIF, its size can be a lot larger than the identical file in SVG.
By the way, an animation created with Lottie is more than just animation. Since the library is built on JavaScript, you can add a bit of magic to your product by making the animation interactive. Moving the mouse or scrolling the page are just a few of the many ways that interaction with an animation can be used.
And last but not least, you don’t have to worry about how it will look on different devices – your animation will look good on any screen, regardless of pixel density and resolution.
All of this gives you an excellent opportunity to develop not just a mobile app, but a unique product brimming with character and style. One that will stand out from the competition, win your users’ hearts and improve their user experience.
Of course, a lot also depends on the choice of technical partner. Reach out to our specialists if you would like to benefit from Django Stars’ expertise.
- Is Lottie better than SVG?
- Lottie and SVG are both widely used for creating animations, but they have different advantages and use cases. SVG (Scalable Vector Graphics) is more versatile and widely supported, but Lottie can be more convenient for creating animations from Adobe After Effects and it can be integrated with code easily.
- Is it possible to optimize the animation of Lottie?
- There are a few ways to optimize the animation of Lottie:
- Reduce the number of keyframes.
- Use vector graphics.
- Optimize the animation for the target device.
- Use the Lottie web player.
- Use the Lottie native player for Android and iOS to offload some of the rendering work to the device's GPU.
- Is it possible to make a Lottie animation in Figma?
Yes. Figma allows you to create vector graphics and export files in the format that Lottie uses. Here are the steps to create a Lottie animation in Figma:
- Install the Lottie Figma plugin that allows you to export your Figma designs as Lottie animations.
- Create the elements of your animation and animate them using keyframes.
- Select the layers you want to export and export them as a Lottie JSON file.
- To add the animation to your project, use the Lottie player for web, Android, or iOS.
It's important to note that Figma is a design tool and not an animation software, so it might not have all the advanced animation features that other animation software have.
- Can Django Stars developers create animations using Lottie?
- Yes. The Django Stars developers team has experienced UI/UX designers who are well-versed in various tools for creating attractive interfaces for applications, including Lottie for animations, similar to the examples in this article. Feel free to contact us if you need assistance to add uniqueness and mood to your app's interface.


